
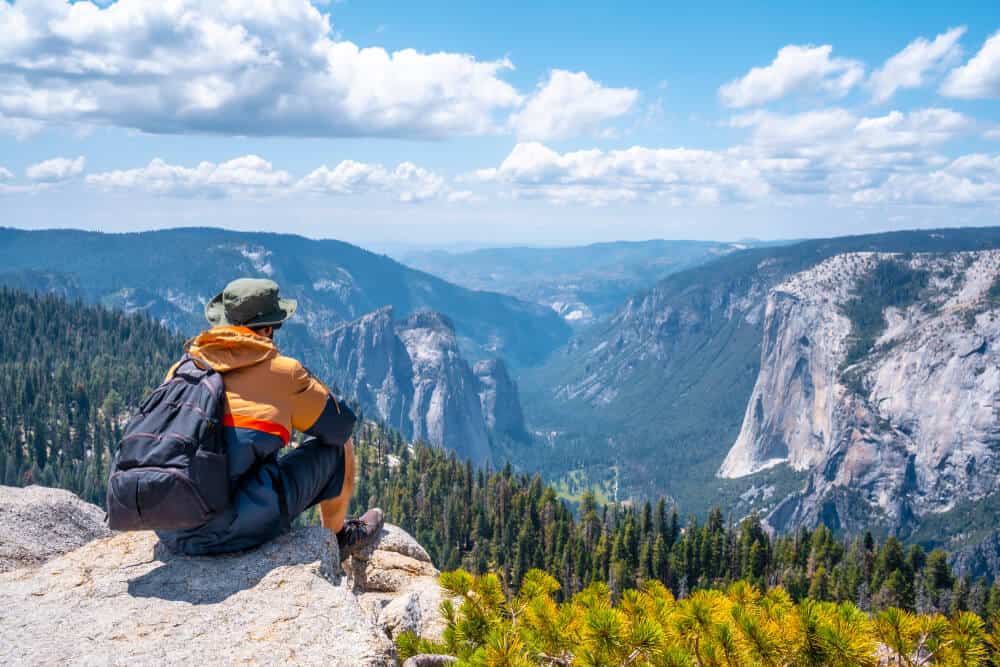
Yosemite Valley – just the name alone conjures up images of magnificent views, taller than belief granite walls, and thundering waterfalls.
Even a single day in Yosemite Valley will show you that Yosemite lives up to its reputation as a premier national park!
Every year, nearly 5 million people visit Yosemite National Park. The park’s popularity makes sense, as Yosemite’s grand beauty is truly unparalleled.
But not to worry – while some of the most famous hikes can get crowded, there are so many hiking options in Yosemite Valley (and hidden gems in Yosemite) that you’re sure to find some solitude if that’s what you’re looking for.
In fact, there are so many hiking trails in Yosemite Valley that picking a trail can get a little overwhelming. That’s where this guide comes in!
Choose an easy, moderate, or strenuous hiking trail, and you can bet you’ll experience Yosemite at its finest, no matter the trail length or difficulty.
Another perk of Yosemite Valley is that most hikes are accessible by the Valley Visitor Shuttle, a free shuttle service that runs from 7 AM through 10 PM all year round. Take the shuttle to your trailhead, and leave your parking woes (and your car) behind!
(Note: Many hikes in Yosemite Valley are not accessible during the winter months, although some trails are accessible by snowshoe. The best time to visit Yosemite Valley for a snow-free experience is May through September, but the park is usually open in the winter as well. Be sure to check the weather by calling a ranger station prior to your visit.)
Where to Stay in Yosemite
Note: This post contains affiliate links, which earn me a small commission at no extra cost to you if you make a purchase using one of these links. Thank you for supporting this free content!
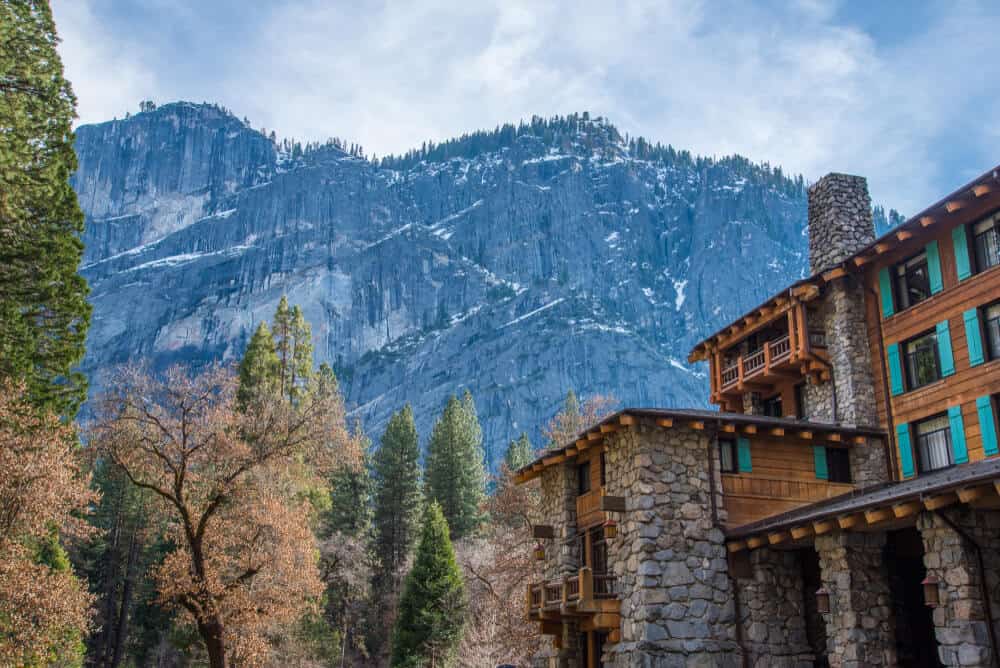
While in an ideal world, we’d all stay in the Ahwahnee Hotel, let’s be real: you have to plan that like, a year in advance for peak times (and 6 months out for off-peak).
Plus it costs like, $800 a night at a minimum even in off-peak times, which is pretty cost-prohibitive for most people.
I’ve picked two affordably-priced options: one more ideal for people heading in from Southern California and another better suited for people heading in from Northern California.
Yosemite has five entrances and they can be up to 2.5 hours between them so you will want to be careful when you book!
Coming from the South (LA/San Diego): Tenaya Lodge
Located right by the South Entrance, the Tenaya Lodge in Fish Camp is a great place to stay — especially if you’re coming from Southern California, as it couldn’t be more convenient.
Tenaya Lodge has all the amenities you want in a comfortable mountain lodge: A/C rooms, an on-site restaurant (a luxury near national parks!), a fitness center (if those Yosemite hikes weren’t enough), and a spa if you want to soothe tired and achy muscles.
The rooms are clean and spacious. They also offer private deluxe cabins with small kitchenettes if you’d like to cook your own meals and have more space to yourself — or they’re a great choice for families.
Check availability, prices, and photos of Tenaya Lodge here!
Coming from the North (San Francisco Bay Area): The Groveland Hotel
Located by the West Entrance — perfect for those coming from the San Francisco Bay Area — The Groveland Hotel is a great home base during your trip to Yosemite, just 24 miles away.
While not in the park per se, it’s a short drive, and Groveland is a really cute California Gold Country town!
The Groveland Hotel’s rooms all offer A/C, seating areas, and Keurig coffee-makers (so you can pack that morning coffee bright and early!).
Some suites have spa baths or even fireplaces — perfect for a cozy, romantic Yosemite getaway!
Best of all, the hotel is pet-friendly and it also has its own electric vehicle charging station in case you are bringing an electric car to Yosemite!
Check availability, reviews, and photos of the Groveland hotel here!
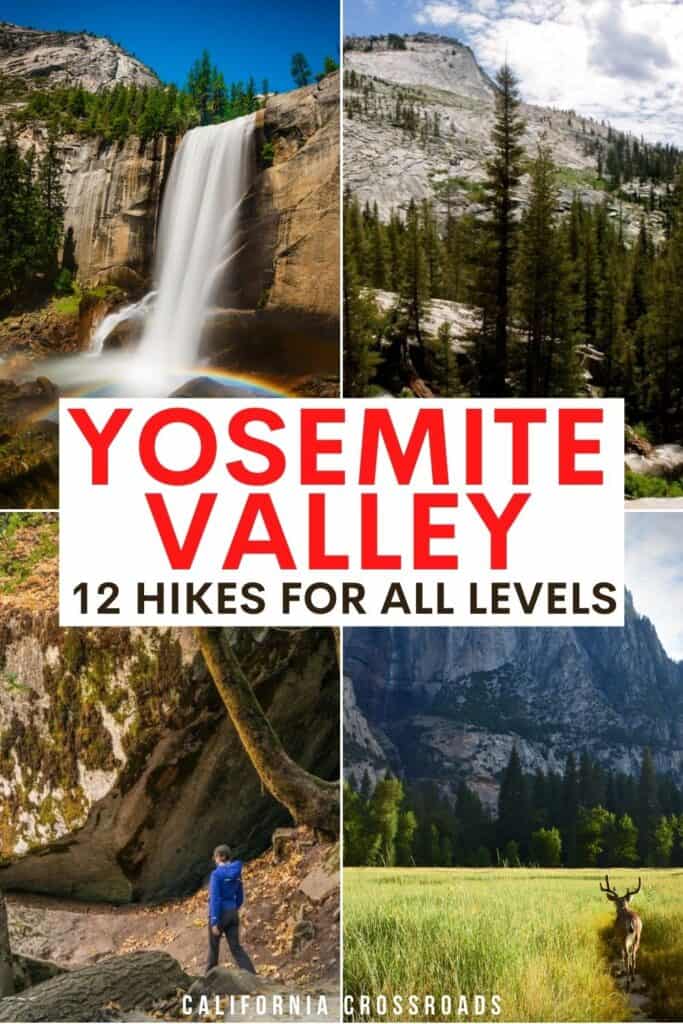
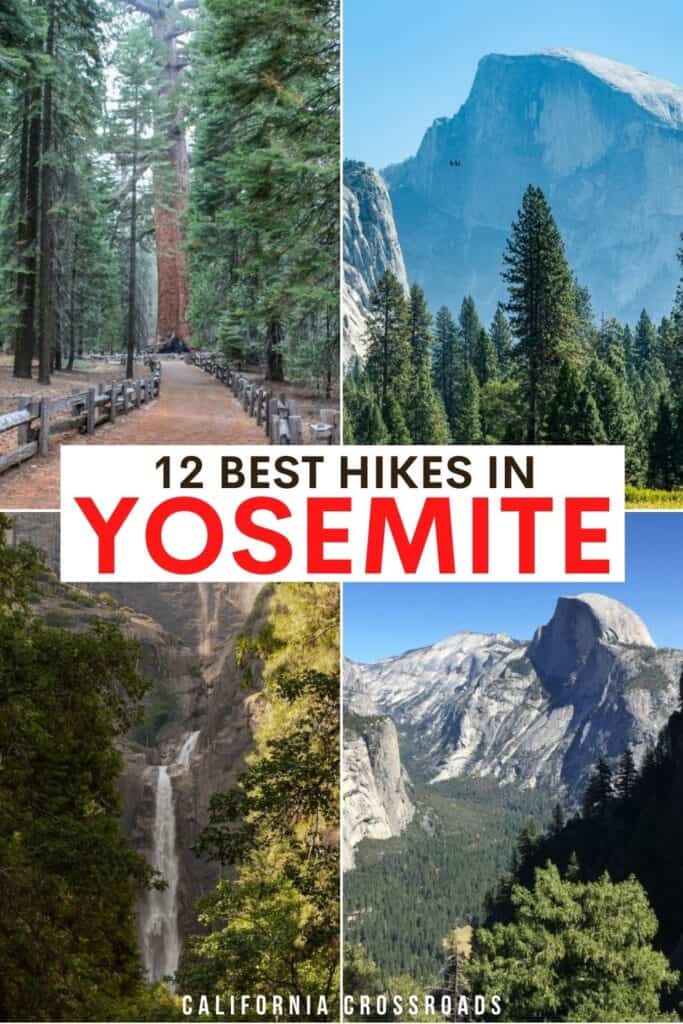
Best Hikes in Yosemite Valley
Easy Hikes in Yosemite
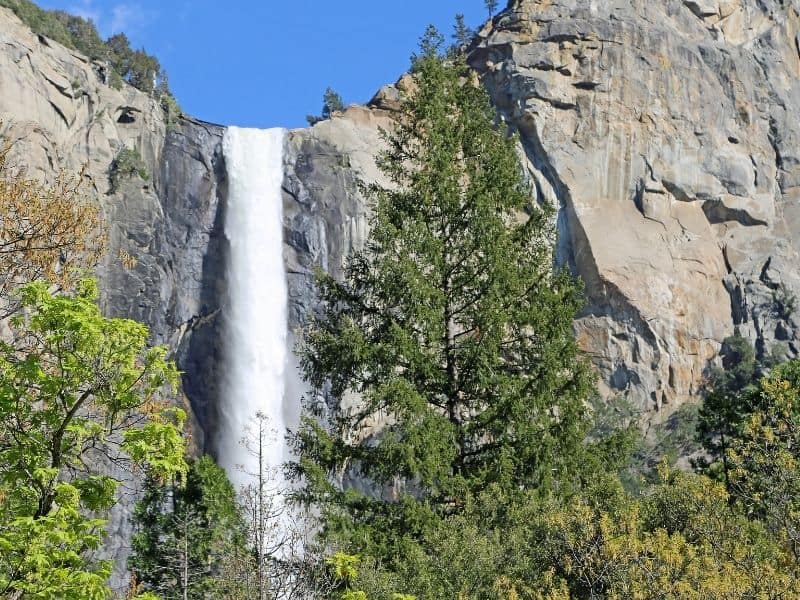
Bridalveil Fall Trail
Distance: 0.5 miles round trip
Total Elevation Gain: 80 feet
Bridalveil Fall is one of Yosemite’s most famous sites, but this doesn’t mean it’s hard to get to! This easy hike to Bridalveil Fall is a family favorite, as it offers a paved path for the short half-mile jaunt to the waterfall.
Unfortunately, the trail is not wheelchair accessible because of its steeper grade. You can also bring your dog (on leash) on this quick hike!
There is no shuttle service to Bridalveil Fall, but there is parking at the trailhead. It does get crowded, so get there early.
For more parking, or to extend your hike a little, park a bit further east on Southside Drive. This option adds about a quarter-mile to your hike, and you’ll get to cross Bridalveil Creek on your way to the waterfall.
Start at the Bridalveil Fall Parking Area and take the paved path all the way to the falls. Bridalveil Fall flows 620 feet to the ground and can be quite a dramatic sight.
In spring and early summer you can expect a lot of water! While the waterfall becomes more of a trickle in late summer, it’s still worth taking this relaxing walk.
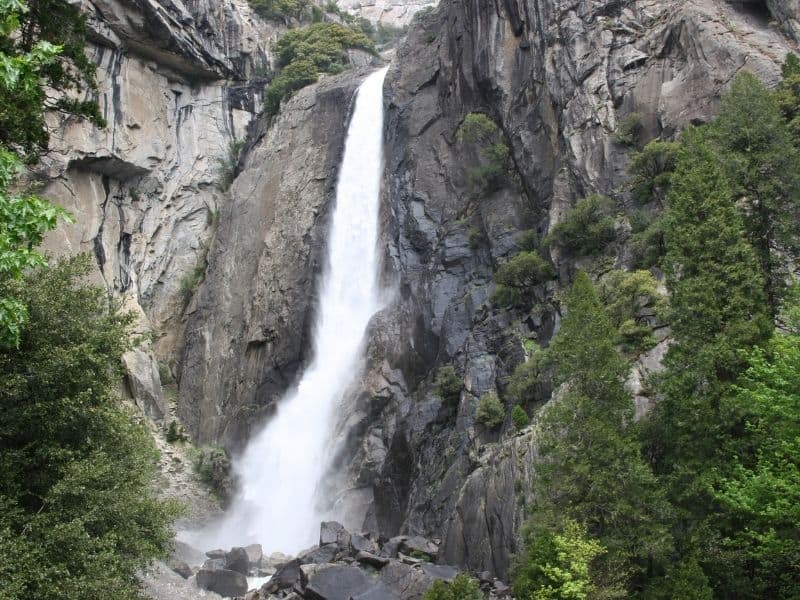
Lower Yosemite Fall Trail
Distance: 1 mile loop
Total Elevation Gain: 50 feet
The paved loop to Lower Yosemite Fall is another classic Yosemite Valley hike that offers a huge reward for minimal effort.
The reward is truly huge, as Yosemite Fall is the tallest waterfall in North America, clocking in at 2,400 feet!
This hike in Yosemite Valley leads you to the bottom of Lower Yosemite Fall, the lowest part of the falls.
While the view is most dramatic when there’s a lot of water (spring and early summer), this stunningly tall waterfall is worth the hike any time of year.
At high water levels, you can even feel the spray of the falls on the bridge near the bottom!
This is a great hike to do with young kids or with a person in a wheelchair (note that only the eastern half of the loop is accessible by wheelchair).
There is no parking at the trailhead, but there is nearby parking at Yosemite Village.
Walk or bike on the bicycle path about 0.5 miles from the Valley Visitor Center, or take the free Valley Visitor Shuttle to shuttle stop #6. From the trailhead, you can take the loop in either direction, but you’ll get the best views hiking clockwise.
Cooks Meadow Loop
Distance: 1 mile loop
Total Elevation Gain: 0 feet
This hike joins together several areas within Yosemite Valley to create a beautiful meadow-filled loop.
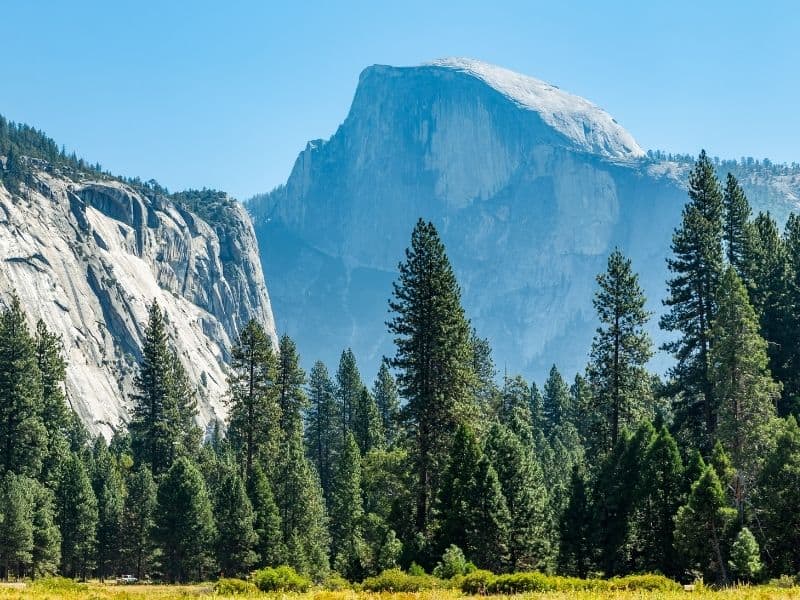
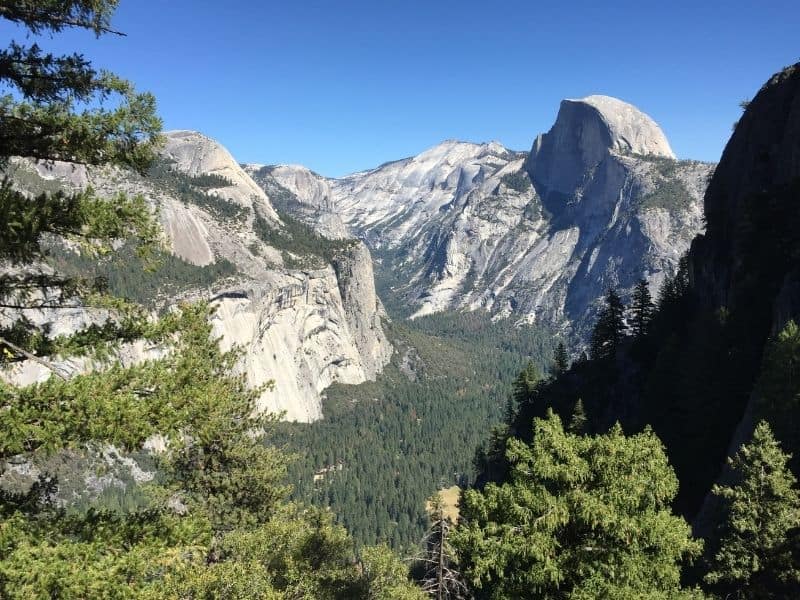
Along this Yosemite Valley hike, you’ll have views of many of Yosemite’s most famous landmarks, including Yosemite Falls, Half Dome, Glacier Point, and Sentinel Rock.
This loop is great because it can be done on foot, on a bicycle, or even by taking the shuttle! The loop is wheelchair and stroller accessible and is open year round.
This loop begins at the Yosemite Valley Visitor Center, or shuttle stops #9 or #5. From there, you’ll walk about a half-mile to Yosemite Fall, shuttle stop #6. Follow the bicycle path across the street and take a left.
Continue walking until you reach shuttle stop #11 for the Sentinel Bridge Parking Area. From there, you can walk out onto the bridge for a stunning view of Half Dome. After returning to the parking lot, follow the boardwalk across the meadow. Be careful, as the boardwalk can get a little slippery!
Take your time in the meadow while you gaze up at the tall granite walls surrounding you. Please make sure not to step off the boardwalk into the meadow, as it is a very fragile environment.
After you’ve crossed the meadow, cross two streets and take a right in order to return to the Visitor Center.
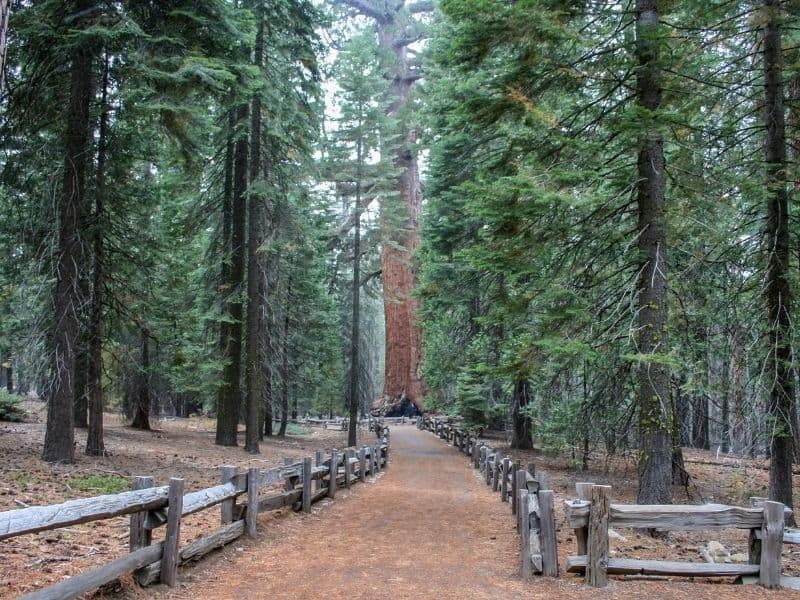
Lower Mariposa Grove
Distance: 2.2 mile loop
Total Elevation Gain: 300 feet
(Note: Mariposa is currently closed due to storm damage. Please check the site for reopening updates),
Explore Yosemite’s Mariposa Grove, the biggest sequoia grove in the national park. You’ll get to see the world’s oldest sequoia, the Grizzly Giant, and walk through a living tree tunnel, the California Tunnel Tree.
Mariposa Grove offers several hiking options that range from easy and short to a bit more moderate. The easiest trail is a short 0.3 miles on the Big Tree Loop, which takes you past the Fallen Monarch, a gargantuan tree that fell about 300 years ago.
For a longer hike, the Grizzly Giant loop (about 2 miles) will take you to the California Tunnel Tree. This short hike does include a steady climb, although it is not particularly steep.
While the area is accessible year-round, the Mariposa Grove hiking trails are a great option for some winter exploration. Strap on your boots (or snowshoes!) and hit the trail.
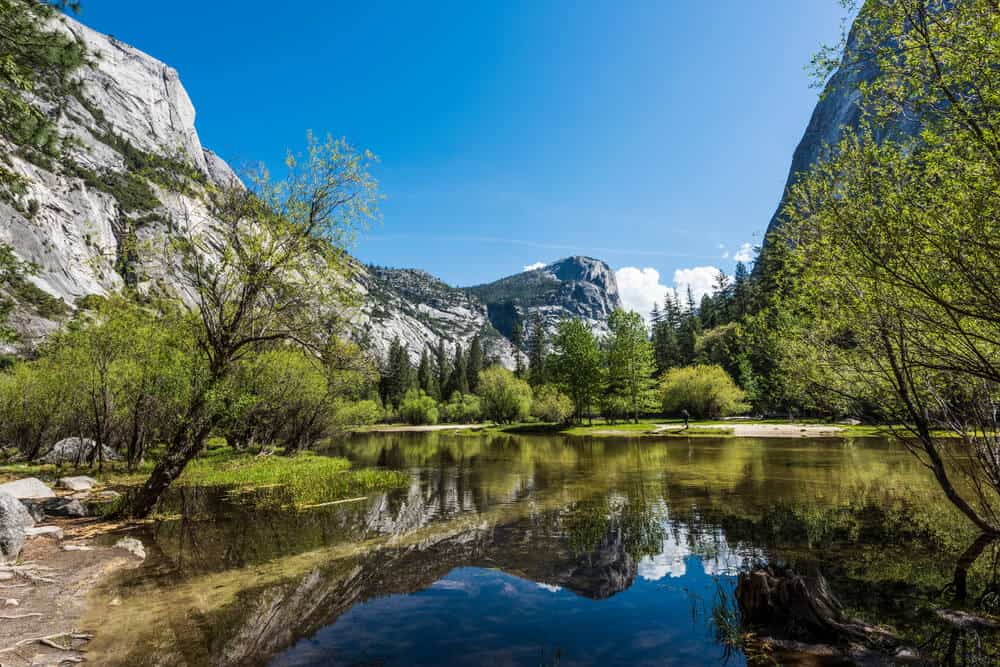
Mirror Lake Loop
Distance: 2 miles to lake, 5 mile loop
Total Elevation Gain: 100 feet to lake, 200 feet total
The Mirror Lake Loop is an awesome way to get to a lake with only a short hike.
The best time of year to visit Mirror Lake is in the spring or summer, as the water gets low later in the year. In fact, sometimes it is called “Mirror Meadow” in late summer!
Whether you’re visiting a lake or a meadow, this trail is a slightly less-traveled gem of a hike in the Yosemite Valley.
This pleasant trail begins at the Mirror Lake Trailhead at shuttle stop #17. The first mile to the lake is paved. At the lake, you’ll have the choice to turn around, or complete the 5-mile loop on a dirt trail through Tenaya Canyon.
When you do the loop, you’ll pass Mirror Lake on its other side. It’s important to note that you cannot access the north side of the lake from the south side of the loop, except for on the established bridges.
While the water may look shallow, crossing or rock-hopping across Tenaya Creek is quite dangerous — don’t do it!
This hike is also great to do with kids, as there are signs along the trail that teach about lake to meadow succession and that discuss the cultural history of the surrounding area.
Lastly, this hike is accessible during winter, but it is recommended that you do a simple out-and-back hike along the north side of the loop, as the south side can get icy.
Moderate Hikes in Yosemite Valley
Valley Loop Trail
Distance: 12 mile loop
Total Elevation Gain: Mostly flat
The Valley Loop Trail is a great chance to get in high-mileage and great views of El Capitan while also avoiding any elevation gain! You’ll also see fewer people on this trail, making it a fantastic opportunity to get away from the crowds of Yosemite Valley for a little while.
The trail begins at Lower Yosemite Fall trailhead at shuttle stop #6 (see Lower Yosemite Fall Trail description above for parking information). Fill up on water here, as there is no water along the trail.
From the trailhead, head west until you reach signs for the Valley Loop Trail. Signs are not always clear on this trail, so it’s best if you bring a map.
The Valley Loop Trail will take you past the famous climbers’ camp, Camp 4, and towards the towering granite wall that makes Yosemite famous, El Capitan.
The view from this trail also offers a stunning reflection of El Capitan in the Merced River below.
At El Capitan, you’ll have a choice to continue the loop, or to cut the loop in half. To hike the half loop, you’ll continue east over the El Capitan Bridge towards Yosemite Village.
To hike the full loop, hike west toward Bridalveil Fall (where bathrooms are also available).
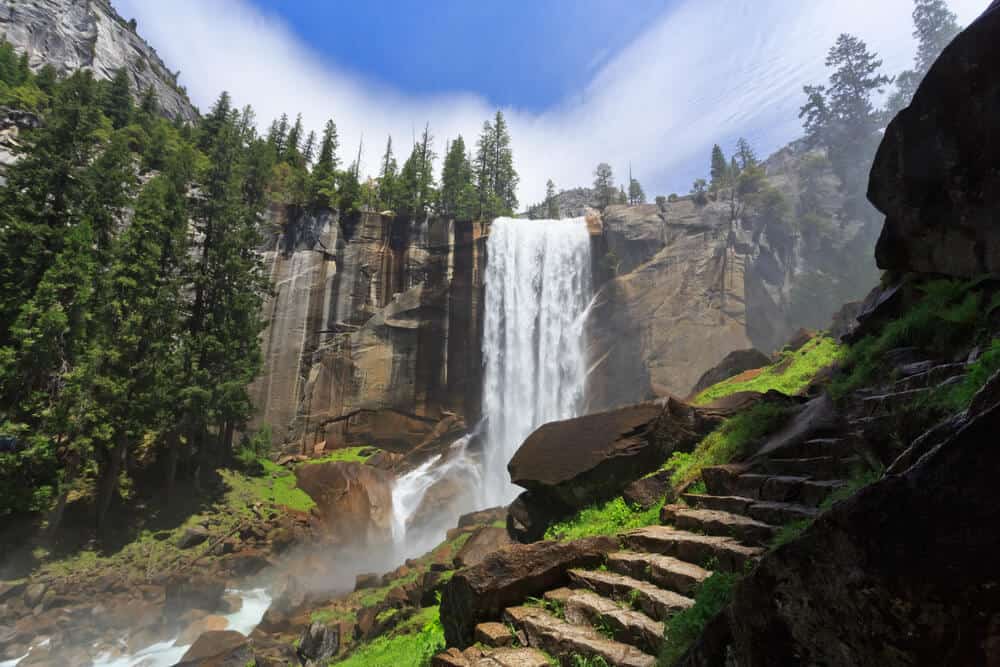
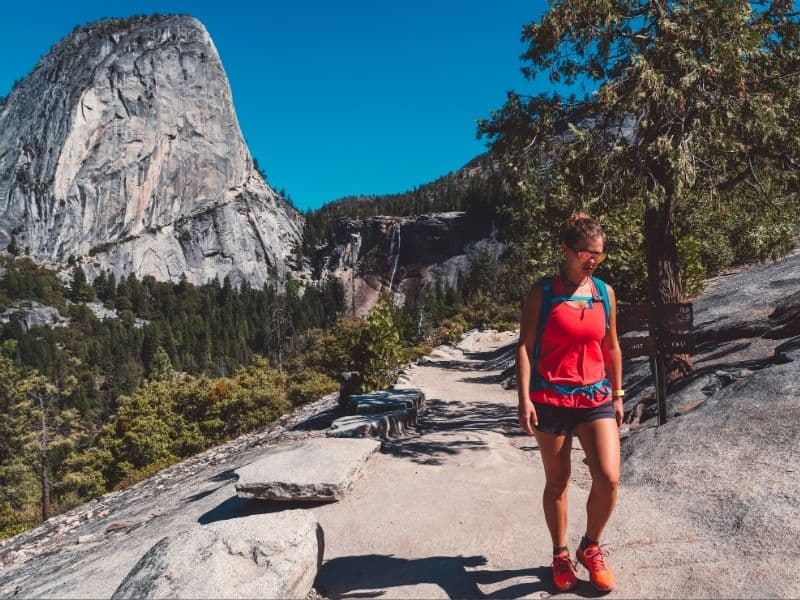
The Mist Trail: Vernal Fall and Nevada Fall
Distance: 2.4 mile round trip to top of Vernal Fall, 5.4 round trip to top of Nevada Fall
Total Elevation Gain: 1,000 feet to top of Vernal Fall, 2,000 feet to top of Nevada Fall
The Mist Trail is a classic Yosemite hike, as it leads to two of the most famous Yosemite landmarks: Vernal and Nevada Falls.
You have the option to take a shorter, easier hike to the Vernal Fall Footbridge, or to take on the strenuous 2,000-foot climb up to the top of Nevada Fall.
No matter how far you go on this trail, you’re guaranteed to have great views along the entire length of the trail.
This trail begins at the Happy Isles Trailhead at shuttle stop #16. Catch the shuttle to the trailhead or walk from Curry Village, where parking is available (walking adds 1.5 miles round trip).
This is also where the John Muir Trail begins! This hike can get quite crowded, so it’s recommended that you start early.
The first mile to the Vernal Fall footbridge is paved. From the footbridge at 0.8 miles, you’ll have a great view of Vernal Fall. To continue on a more strenuous hike, follow the Mist Trail up a set of more than 600 granite-carved steps for about a half mile.
Be careful in the spring, as the steps can get quite wet and slippery! Look out for rainbows in the mist surrounding the 317-foot Vernal Fall.
If you want to turn around here for a more moderate hike, take the way you came, or take a slightly longer route back on the John Muir Trail (JMT) to make a loop. (Note: Going down the steps may be prohibited at some times of year, so you may be required to take the JMT down).
For a more strenuous hike, continue on the Mist Trail another 1,000 feet up to the top of Nevada Fall. You’ll have views of thundering, 594 foot Nevada Fall on the entire 1.5 miles up. Take the John Muir Trail down to make a loop with new views (this is about 4 miles back to the trailhead), or go back the way you came.
As tempting as it may seem, do not swim in the water. The currents can get very strong despite the river looking calm.
Yosemite Falls Trail

Distance: 7.2 miles round trip
Total Elevation Gain: 2,700 feet
This historic trail leads to the top of Yosemite Falls, North America’s tallest waterfall. It is recommended that you start this hike early in the morning because it gets quite hot later in the day.
This trail begins along the Valley Loop Trail at Camp 4. You can take the Valley Visitor Center to shuttle stop #7, or take the El Capitan Shuttle to stop E2 between May and early October.
Parking is available at the Yosemite Falls parking area nearby Camp 4, but parking in the camp is restricted to campers only.
Switchback up about one mile (and 1,000 feet) to Columbia Rock. From here, you’ll get amazing views of the entire valley floor, as well as Yosemite landmarks Half Dome and Sentinel Rock.
You can turn around here, but hiking a mere half-mile farther leads you to great views of Upper Yosemite Fall.
Continue climbing up a steep trail to the top of Yosemite Falls, where you can see Yosemite Creek feeding the giant waterfall.
If you’re still not tired, you can extend the hike to Yosemite Point by following signs for North Dome. This side trip will add 1.6 miles in total, and offers fantastic views of Half Dome.
Strenuous Hikes in Yosemite Valley
Snow Creek Trail
Distance: 9.4 miles round trip
Total Elevation Gain: 2,700 feet
This trail goes beyond the Mirror Lake hike described above, and extends into Tenaya Canyon.
The hike is extremely difficult, as you’ll climb all the way up to Yosemite Valley’s rim. You’ll be rewarded with fantastic views and more solitude, as this trail is not as crowded as others.
Begin on the Mirror Lake Trail (shuttle stop #17), and then continue about a mile beyond the lake to the junction with the Snow Creek Trail.
Continue on the trail until you begin climbing out of Tenaya Canyon. Take a (much needed) break on the switchbacks to take in views of Half Dome and Clouds Rest.
After climbing for about 2.5 miles, you’ll reach a junction. Take a right to reach a footbridge, where most hikers turn around.
The fact that this hike has no official terminus means that you can really turn around whenever you want — you can still take in the sights from a lower elevation!
Four Mile Trail
Distance: 9.6 miles round trip
Total Elevation Gain: 3,200 feet
Contrary to its name, this trail is actually a little longer than 4 miles, at 4.8 miles one way.
This hike is known as the hardest route to Glacier Point, an amazing overlook that offers views of all of Yosemite’s most famous landmarks.
While difficult, the Four Mile Trail will reward you for your effort with amazing views along the entire trail.
The trail begins at the base of Sentinel Rock. You can park along Southside Drive (follow signs for the Four Mile Trail), or take the Valley Visitor Shuttle to stop #7 (or the El Capitan Shuttle stop E5).
From the shuttle stop, follow the bike path to Swinging Bridge, and then walk west to the trailhead (this walk adds .5 mile to the hike).
This hike continues climbing until you reach Glacier Point. Look out for views of Yosemite Falls, El Capitan, Half Dome, The Sentinel, and Tenaya Canyon. A very short side trail will take you to Union Point, which is a great overlook spot to stop for a snack.
To keep this hike closer to a true 4 miles, you can arrange for a friend to pick you up at Glacier Point (parking is available), or hike back down.
There is also a bus that runs three times a day from Glacier Point to the valley. You can purchase a ticket from the driver at Glacier Point, but there is no way to guarantee space.
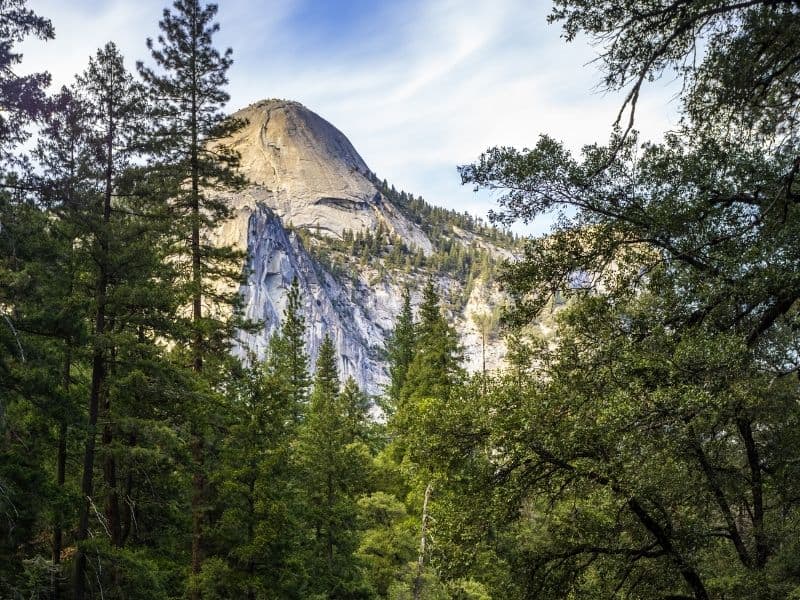
Half Dome Trail
Distance: 14 miles round trip
Total Elevation Gain: 4,800 feet
Everyone’s heard of Half Dome, but not everyone has summited it! This hike is one of the most famous hikes in the United States, but is also quite difficult.
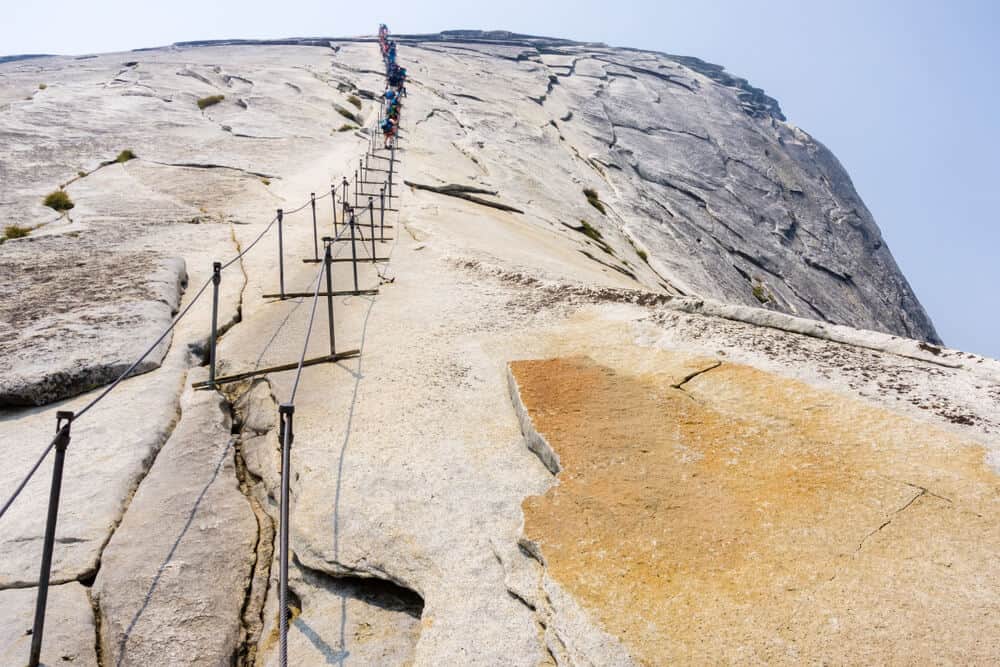
The last section of the hike is the Cables Route, where you’ll make your way up to the top of Half Dome using metal cables installed in the rock. This hike is not for the faint of heart, but it’s bound to be quite an adventure!
You will need a permit for this hike, as only 300 hikers are allowed on the trail each day. The permits are available by lottery on Recreation.gov. For more information on permits, please see the park website.
It is most common to start the hike from Happy Isles (shuttle stop #16), which is about 0.5 mile from the trailhead parking lot and about 0.75 mile from Curry Village, where parking is also allowed.
The shuttle service doesn’t begin until 7 AM, so don’t depend on that for your transportation if you’re getting an early start.
Starting at Happy Isles, you’ll take the Mist Trail up past Vernal and Nevada Falls. At Nevada Fall, you’re about 5 miles away from Half Dome.
Continue on the John Muir Trail until you hit the junction for the Half Dome Trail, then follow the Half Dome Trail another few miles up to Half Dome itself. After the harrowing cable climb, celebrate on the large granite top of Half Dome!
Weather in Yosemite National Park is variable, and the area is prone to afternoon thunderstorms later in the summer.
In order to avoid storms and give yourself enough time to complete the hike, it is recommended that you check the forecast, and begin hiking around sunrise. It is also recommended that you bring a headlamp in case your hike takes longer than expected.
The cables are typically only accessible Memorial Day through Columbus Day, but make sure to check the dates and weather conditions on the park website. Do not use the cables if they are wet.
Cloud’s Rest
Distance: 19.8 miles out and back
Total Elevation Gain: 5,346 feet
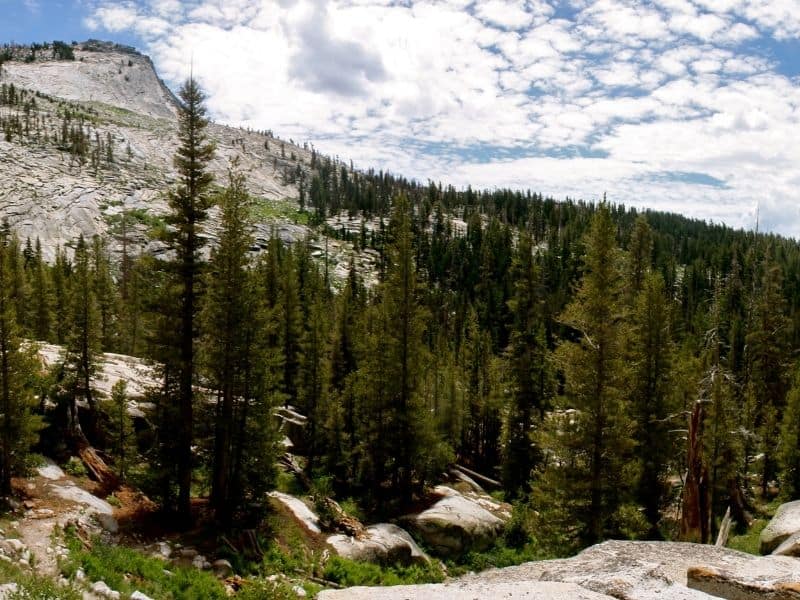
Cloud’s Rest is truly so high that you’ll feel like you’re up in the clouds — and on a cloudy day, you may even be up in the clouds! This is one of the most difficult hikes in Yosemite Valley.
The difficulty pays off though, as you’ll get stunning views of the valley below you without the crowds (or permit hassle!) of Half Dome.
Like Half Dome, this trail begins at Happy Isles Trailhead. Take the Mist Trail past both falls until you hit the John Muir Trail. Take the John Muir Trail up until you reach a junction with the Cloud’s Rest Trail.
You’ll begin switchbacking steadily up, surrounded by granite slabs. You’ll be rewarded at the top with an amazing view of Half Dome and the rest of the valley, from an angle that most park visitors don’t get.
This is another hike where it is absolutely crucial that you leave prepared with plenty of water, layers, food, navigation tools, and a headlamp. Make sure you check the forecast, and turn around at the first sign of storms.
What to Pack for Yosemite Hikes
First aid kit: You’ll want to pack a small kit with the things you need — but in my opinion, it’s better to buy a pre-made first aid kit as it’ll likely cover things you might forget.
I recommend this HART Weekend First Aid kit, which has extras in case you use something, so you won’t have to replace it as often.READ NEXTOne Day in Yosemite National Park: Itinerary for a Quick Day Trip
Headlamp (and extra batteries): In case you’re planning any sunset hikes where you may come back after dark, you’ll want a headlamp to keep your hands free as you hike in the dark.
Trust me, you don’t want to have to rely on the flashlight funciton of your phone – I’ve learned this the hard way before!. This Petzl headlamp is highly-rated and affordable.
Water Filter Bottle: There are a wide variety of water filtration systems and treatments, but for a day hike, I recommend a water bottle with a filtration system set up inside of it. I recommend the GRAYL Geopress.
It’s compact and easy to use, and you can refill from anywhere: streams, waterfalls, lakes, you name it, without getting sick. Otherwise, you can only refill at designated drinking water stations in the park.
Rain gear: A rain jacket is great to have as a just-in-case: nothing ruins a hike quite like a sudden shower without a rain jacket.
I recommend Marmot brand — this men’s jacket is great and stylish, and I have the women’s Marmot Precip (and have had it for years) and love it.
Day pack: No need for a giant backpack for these easy Yosemite hikes! Just bring a comfortable day pack. Look for something with a mesh back panel, so it’s less hot and sweaty against your back.
I suggest picking something with waist straps and a shoulder strap to help distribute weight if you’re someone who gets back pain easily *raises 80-year-old hand*. I love the Osprey day pack – it’s cheap but durable, so comfortable, and has all the features you need for a day hike.
Sunscreen: Wear this every day of your trip — even on a cloudy day!
Sunglasses: Great for unshaded trails and sunny days!
Hiking boots: You’ll want good, possibly waterproof hiking shoes for these Yosemite hikes!
I own and love my pair of Ahnu Sugarpine hiking boots and recommend it for other women – especially if you have wide feet like I do! For men, I’ve heard good things about the KEEN Durand boot, but haven’t used them personally (for obvious reasons).
If you’re only doing the really easy no elevation hikes, you can maybe get away with doing these Yosemite hikes in tennis shoes, but I have really bad ankles and am always grateful for the extra ankle support. Even a pair of work boots like Timberlands are a lot better than sneakers.
Camera: I use and love my Sony A60! It’s mirrorless, so it’s lightweight and perfect for a high-quality camera that won’t weigh your pack down.
Sunhat: To keep sun off your face – I recommend a packable hat like this one which has a strap so it won’t blow off in guests of wind and you can easily wear it on your back when you don’t feel like wearing it on your head.

Lena is an outdoor recreation enthusiast born and raised in the San Francisco Bay Area. After going on her first camping trip at 3 months old, she hasn’t stopped since. While her backpacking adventures have taken her to wilderness destination across the country, California’s mountains and deserts will always be her favorite.